In this article we are going to have a look at how to configure automated trading using CQS Signals. https://cryptoqualitysignals.com/
Table of Contents
STEP 1: Subscribe to Signal Service

Click on Signals from header menu then click on connect button and follow the steps of making the payment according to your preferred signal subscription duration. Once payment is complete then connect button will become connected. Once signal service is connected you will be able to use this signal to configure trigger orders as shown in next step.
STEP 2: Configure trade template to automatically place trades whenever any new signal comes
STEP 2.1: Buy order configuration
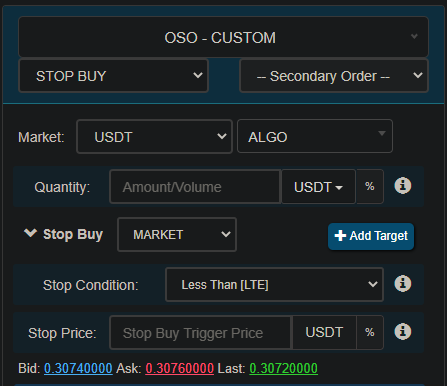
Select OSO-CUSTOM from main order dropdown. Then select Stop Buy as primary order. Put Quantity value and quantity unit based on your preference.
Put Stop price any value (Eg. 1%) and click on percent icon. This stop buy price we will override later based on price from signal.
Then click on trigger button.
STEP 2.2: Trigger Configuration
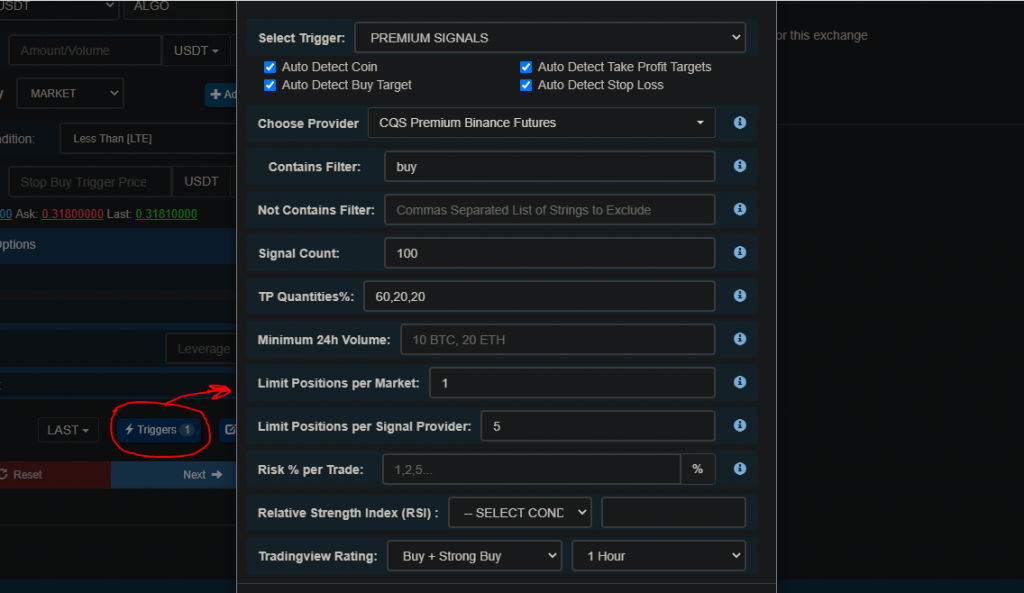
Click on trigger button in primary order to open the trigger configuration popup.
- Trigger type: Premium Signals
- Auto Detect Coin: Enabled
- Auto Detect Buy Target: Enabled
- Auto Detect Profit Targets: Enabled
- Auto Detect Stop Loss: Enabled
- Chose Provider: Select provider based on the exchange you are trading for. In this example I am using CQS Binance futures.
- Contains Filter: In this example we are going to listen only to long signals so add “buy” keyword
- Signal Count: This count determines how many trades will be opened based on this trigger setup. Max is 1000.
- TP Quantities: CQS Signals contains 3 sell targets. If you wish to sell all coins on 1st target then put 100 in this box. In this example I wish to sell 60% on 1st target, 20% on second target and 20% on third target. So my input will be 60,20,20. If user leaves this input empty then it will auto calculate equal sell quantity for all targets in case of 3 targets it becomes 33.3% quantity on each target if user leaves this input empty.
- Limit positions per market: 1. We are going to keep only 1 position open per coin pair and ignore signal if position is still open for same coin pair.
- Limit positions per provider: This is based on the total funds that you wish to risk at a time. If i wish to invest 100$ and my position size is 20$ each then my number of open positions can be 100/20=5. So I will do 5 positions per provider.
- TV Rating Filter: This is used to improve signals accuracy. Select BUY+Strong Buy in 1 hour time frame.
Click on done and then click on next to start configuring sell orders
STEP 2.3: Sell order configuration
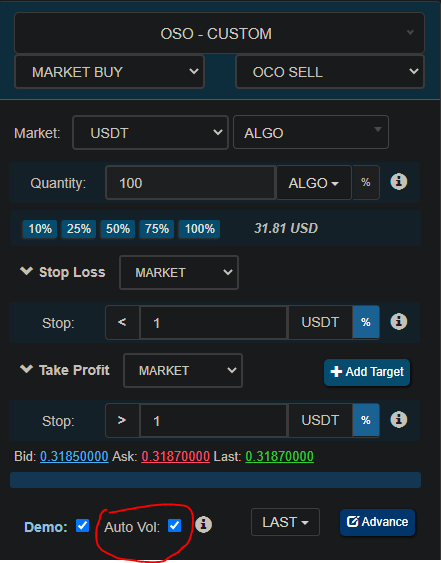
Select OCO SELL as secondary order in OSO. Put some random percentage stops in Stop loss and Take profit inputs. This will be replaced with actual prices from signals. In case you wish to use your own profit targets like fixed 1.5% profit target in all signals then you can configure here and uncheck Auto Detect target while doing the trigger setup in previous step. Make sure to enable Auto-Volume to automatically derive sell total quantity based on buy quantity. Then click on submit.
STEP 3 (OPTIONAL): Tracking Trade history and Signal logs
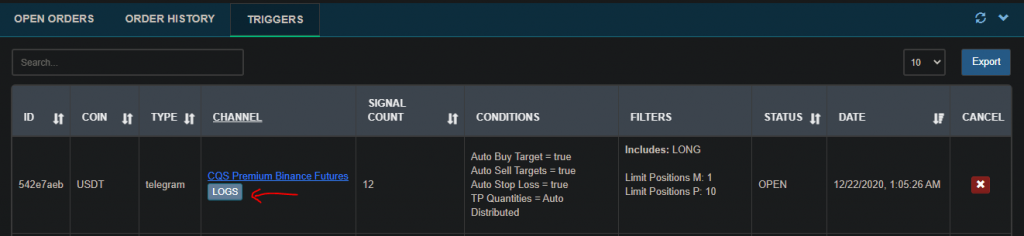
Your signal configuration process is complete now wait for the signal to arrive. and keep checking open orders and order history table to see current status. In triggers table you can click on logs button to see real-time logs of incoming signals.
DCA Buy (OPTIONAL)
One sure shot way of increasing chances of winning and reaching profit target at a faster time is using DCA to buy at different levels instead of putting all money at once. For binance futures recommended DCA targets are 0%, -1.5%, 3%.
For binance recommended DCA targets are 0%, -3%, -5%. You can try out other variations by testing trigger based orders using demo trades.
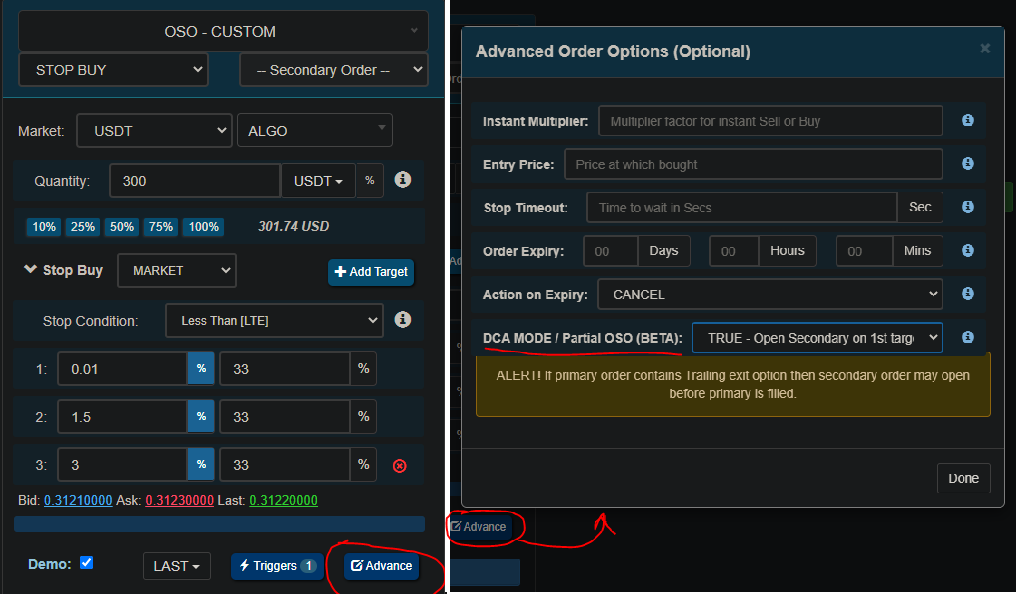
In above pic 1st buy target will be replaced with buy target price from signal if auto detect buy target is enabled. Remaining buy targets will be relative to the price at the time trade was opened.
For more detailed info about how DCA bots work have a look at this article – https://www.Growlonix.com/support/article/dca-buy-sell-bots-for-long-and-short-positions-on-top-crypto-exchanges
Moving Targets/Break-Even Stop loss (OPTIONAL):
Moving targets stop loss means the bot will move your stop loss to the price of the previous take-profit target, the one before the new take-profit target that is reached.
More specifically, when the first target-profit is reached the stop will be moved to the breakeven price, when the seconds take-profit target is reached the stop will be moved to the first take-profit target price and so on.

Configure this while creating sell order template (STEP 2.3).
In take profit click on add target button and add 3 targets with preferred volume to sell at each of these targets. Put any random stop price which will later be replaced with actual stop price from the signal. Click on Break-Even button to enable moving target feature.
For more detailed explanation on moving target stop please refer to this article:
https://www.Growlonix.com/support/article/break-even-stop-loss-on-binance-bittrex-and-any-other-crypto-exchange